Linux, Linux OS, Free Linux Operating System, Linux India Linux, Linux OS,Free Linux Operating System,Linux India supports Linux users in India, Free Software on Linux OS, Linux India helps to growth Linux OS in India
This month we learn how to use the Image Window and layers in building our images with the GIMP, a Linux power tool for the graphics artist.
Patience and persistence has paid off. After two articles you sat and wondered “When do we get to the meat?” In the first article of this series I introduced the GIMP and explained some basics about retrieving the program and getting it running. Last month I took a look at some of the GIMP’s windows and and described the image file formats it supports. We’re now ready to start looking at how you can use the GIMP. I’ll start by looking at where images are displayed and manipulated: the Image Window.
The Image Window
Figure 1 shows an Image Window along with the Layers and Channels dialog. The visible parts of the Image Window consist of the Image display area, the rulers across the top and left sides and the scrollbars across the bottom and right sides. Pop down menus and the Ruler Guides are not visible by default but are easy to access.
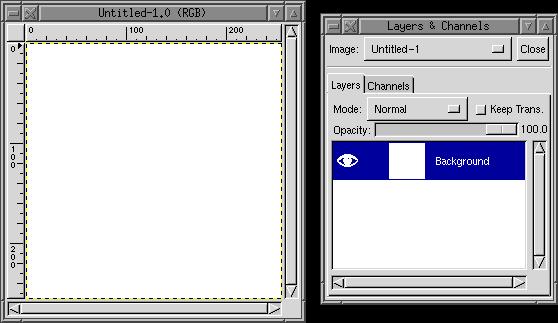
Figure 1. Image Window with Dialog Box
By default, if the Image Window’s dimensions fit into the displayed screen area, the rulers are divided by units of 10 pixels with major tick marks at intervals of 100 pixels. There are two other sizes of tick marks, those for units of 20 pixels and those for units of 10 pixels. If the Image Window’s dimensions are larger than the displayable screen area, the GIMP will provide a window that uses major tick marks at units of 250 pixels. However, since the image would actually be larger than the screen, the Image Window does not display the image pixels one per display pixel. Don’t let this confuse you. You can zoom in on your image to get pixel-level details. The GIMP is just smart enough to know how to handle images that are too big for the display. This capability is useful for design work destined for print media.
The units represented by the tick marks in the rulers can be specified in the gimprc file (which was covered in the first article in this series). By default the units are in pixels, but this can be changed to inches or centimeters at the user’s discretion.
Guides are straight dashed lines alternating red and black. These extend from the left to right edges of the Image Window’s display area or from the top to the bottom of the display area. To create a new Guide, move the cursor over a ruler (top or left side), hold down the left mouse button and drag into the display area. A new Guide, parallel to the ruler from which you dragged the cursor, is created. When the cursor is over the Guide, it changes to a left-hand pointer (a hand with the index finger extended). Hold down the left mouse button to grab the Guide and move it to a new location. To remove the Guide, grab it and drag it back over the ruler and release the mouse button.
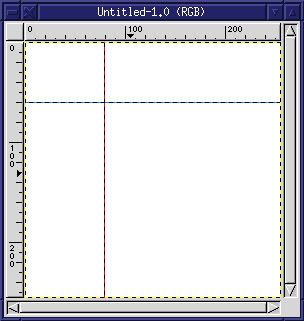
Figure 2. Two Guides
Figure 2 shows two Guides, one horizontal and one vertical. Guides are useful for aligning objects or for snapping selections to specific areas. You can toggle selections to snap to the Guides from the Image Window’s pop-down menu (“View->Snap” To Guides). Guides, although visible in the Image Window, are not saved to files of any image type except XCF. If you save a file to GIF or JPEG or TIFF for example, the Guides will not show up in the image file.
The scrollbars perform just as scrollbars in any other windowing application. Grab the slider with the left mouse button held down to slide the image up/down or left/right. Click in the scrollbar outside of the slider (if the slider does not extend the length of the scrollbar) to page through the display area. Click on the arrow buttons on the ends of the scrollbar to increment or decrement your way through the display area.
The most important features of the Image Window are the pop-down menus. From these you will have access to all of the GIMP’s image processing capabilities. To post (i.e., display and leave open) the menus, place the cursor over the display area and click the right mouse button once. The top level menu will open and stay open until you either click outside the menu windows or select a menu option. Some of the options open submenus, which will also stay open if you simply click on those options. Clicking/dragging over the menus also works, although the menus will close if you drag the mouse off the menus and release the mouse button.
The Image Window’s pop-down menus are divided into the following categories:
- File Menu: new, open, close (window), quit (completely), etc.
- Edit Menu: copy, cut, paste, clear, stroke, etc.
- Select Menu: all selection methods, including growing, feathering and shrinking selections
- View Menu: zoom in/out, toggle rulers/guides, etc.
- Image Menu: invert, color balance/contrast/adjust, convert to/from RBG/Grayscale/Indexed, etc.
- Layers Menu: functions applicable to the currently active layer.
- Tools Menu: access to all the tools available from the Toolbox.
- Filters Menu: the large set of image filters such as blurring, embossing, bump mapping and many more.
- Dialogs Menu: provides a convenient way to open the various dialogs such as the Gradient Editor, the Layers and Channels dialog, the color palette and the brushes dialog.
Descriptions of all of these would be far more than I can fit into one series of articles. I will cover some of the more interesting filters in next month’s article and will provide a detailed description of the Toolbox. Most icons accessible from the Toolbox are also accessible from Image Window menus, and those that aren’t are modifiable through Image Window menu options.
The rest of the menu options each have fairly obvious meanings. The File Menu options are nothing special, although you may want to take a look at the Preferences… option. Selecting this option opens a window which provides the user with access to configuring the way transparency is represented in layers and in the gradient editor. These changes are for the current session only and are not saved across invocations of the GIMP. You must manually edit the gimprc file to make permanent changes to these preferences.
An interesting option under the Edit Menu is the Stroke option, available after a selection is made. I’ll discuss selections more in a moment, but for now, note that there are many ways to select portions of your images in the GIMP, and each method is a form of a selection. A selection is denoted by a dashed line around the edge of the selection that appears to move around that edge and is known as “marching ants”. The selection outline can be used to draw a line along that edge by using the Stroke option. The color of the line must be chosen after the selection is made, and you should also select the appropriate brush. Once that is done, just select “Edit->Stroke” and a line in the selected color will be drawn using the selected brush. I know, I know—“How do you choose the color?”, “How do you choose the brush?” That’s next month—there’s just so much to cover.
You will find that one of the most important operations you will use with the GIMP is that of selecting portions of the image for modification. There are rectangular, ellipse, free-hand, fuzzy and bezier selection tools available from the Toolbox. The Image Window’s Select Menu offers other methods such as all, none and select by color. This last method is one I use quite often to accurately select regions of irregularly shaped (but uniformly colored) areas of an image. I can then keep that selection, add a new transparent layer and fill the selection with a gradient in the new layer. Selections can be made in any layer. The selection doesn’t actually affect particular pixels. They just mark a region of the image. Because of this, you can change which layer you are working on after you’ve made a selection and then work with the same selected region in another layer. This will allow changes to the new layer within the selected region and leave the old layer, where the selection was originally made, unchanged.
The GIMP is an image processing tool. It works by manipulating images based on the color, distribution, frequency and other aspects of the pixels which make up those images. I haven’t talked before this about the sorts of manipulations that can be done. A great majority of them are done through the use of Filters, also known as Plug-Ins. This is a large area of discussion and better suited to the last article in this series, however not all image manipulation is done through Filters. The Image Menu in the Image Window’s menu allows users to do a number of image processing tasks on an image and/or its layers. Most of the image processing tasks here relate to the general color, brightness or tint to an image as a whole and worry less about how individual pixels relate to their neighbors.
The Image Menu also allows transforming the image type from RGB (generally known as high color, 24-bit images) to Indexed (256-color images) to Grayscale (black and white) images. If you find you want to change a color image to black and white, but leave it as an RGB image (so you can add color to it later), you can use the “Image->Adjust->Desaturate” option. You can also adjust the amount of Red, Green or Blue in an image using the “Image->Adjust->Curves” option. I’ve often used the Curves and “Image->Adjust->Color Balance” option in conjunction with the Chrome Script-Fu script to add or enhance color to the edges of text logos. The latest version of the Linux Gazette logo was created in part using this technique.
Layers
I just got through mentioning the use of layers in conjunction with selections. Layers are like transparencies used for overhead projectors, with the ones on top mixing with layers below to produce the final image. Each layer can be added, subtracted, multiplied, screened, overlayed and have any of a number of other processes applied to it with respect to the layers below it. By default, a new image has one layer—the Background layer. The default for this layer is to be solid white, but it is possible to change this based on the background color and transparency settings.
Layers are accessed via the Layers and Channels dialog box. This dialog is opened from the “Dialog->Layers and Channels” menu option from the pop down menus in the Image Window. Figure 3 shows a sample of the dialog in use. Inside the dialog there are a number of features: an image selection menu, the Close button and a notebook with tabs for choosing either the Layers or the Channels feature. In the Layers page of the notebook there is a menu for selecting the Mode to apply to this layer (such as add, subtract, darken, etc.). It’s also possible to apply a uniform transparency level to the current layer using the Opacity slider.

Figure 3. Layers and Channels Dialog Box
Below the slider there is a window which shows each of the layers for the current image specified in the Image Menu (which is located at the top of the Layers and Channels Dialog). Each layer displayed contains four default fields: visibility, move anchor, a thumbnail preview of the layer and the layer’s name. A grayscale mask field is not displayed by default, but can be created by selecting the Add Layer Mask option from the Layer Menu. This menu is opened by clicking the left mouse button over the name of the current layer and is used for all layer specific functions except transparency and mode selection. Double clicking on the layer’s name will bring up the Edit Layer Attributes dialog in which you can specify a new name for the layer. Get into the habit of setting the names of layers often, since many of your images may have many small layers; finding the one you want simply by looking at the thumbnail may not be easy. In most cases, changes to an image affect only the currently active layer. The active layer is the highlighted one in the list of layers. On most systems this is a blue highlight, although it’s possible this might be some other color on very low-end systems with limited color displays.
A few things to note. First, changing the name of a layer will add an Alpha channel to the layer. There are lots of special tricks you can do with Alpha channels that are beyond the scope of this series, but you should be aware that the Background layer, by default and before you have changed its layer name, has no Alpha channel. Also, the size of the thumbnails can be set to just about any size via an option in the gimprc file. As was mentioned in the first article, you should eventually become familiar with the gimprc file, if you find the default settings are not to your liking. You’ll be surprised at how much you can configure in the GIMP.
The visibility icon, an eyeball, is used to turn the layer on or off. If the layer is off, its effects on the visible image in the Image Window are removed. Clicking on the field containing the eyeball will toggle the visibility of the layer. When the visibility is off, the eyeball will not be displayed. The visibility icon will be in the far left side of the currently selected layer, directly beneath the “Opacity” text in the Layers and Channels dialog. If you don’t see the eyeball there, click the left mouse button in that area and the eyeball will appear. This may or may not affect the visible image in the Image Window, depending on the contents of that layer and the Mode currently selected.
Often it is useful to move more than one layer at a time, i.e., as a group. By default using the Move Tool (in the Toolbox) will affect only the current layer. Clicking on the second field for a layer, the move anchor will set that layer to move along with any other layers which also have their move anchor set. When the move anchor is set, a fleur icon is displayed. A fleur consists of two double ended arrows, perpendicular to each other. Although actions on an image specifically affect the currently active layer, any layer with its fleur displayed will also be moved when the Move Tool is used on the current layer.
Moving a layer can take a little practice. Some layers, due to the use of transparency, are harder to grab than others because very little of the non-transparent region is actually visible. Other layers, higher in the stacking order, may obscure most of a lower layer. When moving a layer you will find it easiest to first select the Move Tool from the Toolbox. Next, move the cursor over a region in the Image Window that you suspect is part of the layer you wish to move. The cursor should change to the fleur symbol when you are over that region. If you then click on that spot and discover the layer selection has changed to another layer, then stop. Press ctrl-Z to undo any moves you’ve made, if any. (If you accidently undo something you didn’t want to, just use “Edit->Redo” in the Image Window menus or ctrl-R to get it back.) Now turn off the visibility of the higher level layers until the layer you want to move is the highest visible layer. You should now have a better chance to grabbing just the layer you want. If you still have problems, you can turn off the visibility of all the layers, higher and lower levels. Again, all of this takes a little practice.
The list of layers is shown with the topmost layer at the top of the list and the bottom layer, the background layer, at the bottom. When the layers are combined, also know as composited, they are combined from bottom to top. So the bottom layer defines the start of the image’s initial appearance before the other layers are combined with it. The Image Window will display the image based on which layers are currently visible. The compositing is done by the GIMP in a way that is invisible to the user except for changes made to the Mode or visibility of a layer. Since the layers are processed from bottom to top, the order of the layers is important. Layers can be raised or lowered using the Layers Menu. The Layers Menu is opened by clicking the left mouse button over the name of a layer. Selecting an option in the Layers Menu only affects the layer over which the menu was opened.
The size of the preview in the Layers and Channels dialog can be set in the gimprc file. Smaller preview sizes do not really speed up processing but do require less memory and allow more layers to be displayed simultaneously. Layers themselves are not constrained to the same size, although when producing the final image, a constraint of some kind will be applied to all layers. The constraint used depends on the way the final image is produced from the layers.
Layers provide tremendous flexibility in producing images in the GIMP, but they can cause a little confusion when first starting out. It is important to note the following about layers when saving or loading images:
- New images have a single, white background layer.
- Opening an existing file in any format except XCF will load the image into the background layer. You cannot open an image into a layer of an existing Image Window. If you want to do this, you need to open the image in a new window, select the entire image (ctrl-A in the Image Window), copy it (“Edit->Copy”) and then paste it (“Edit->Paste”) into the existing Image Window.
- Saving an image in any format except XCF will save only the currently active layer. If there is more than one layer and you want to save the image visible in the Image Window to GIF, JPEG or some other format, you should first flatten the layers and then save the image.
- Saving an image with layers using the XCF format will save the image while preserving all the layer information.
The XCF format is the native file format for the GIMP and you should save all work in progress in this format. This format will necessarily produce very large files, much larger than the other file formats available. When you are done working on an image and ready to produce the final image into one of the many image file formats supported, you need to merge all the visible layers or flatten the image. The latter process will remove transparency layers (after processing them) and constrain the final image to the visible size of the image. The former is similar, but preserves transparency and can be constrained to the actual image size, the size of the bottom layer or can be expanded as needed.
Flattening an image takes all the layers and combines them in a way that matches what you can see visually in the Image Window. Merging the layers can expand the image to encompass non-visible portions of some layers. In most cases, I’ve found flattening works better for my work. Merging can leave unwanted transparent regions that get translated to black or other colors in GIF or JPEG images. This doesn’t mean there aren’t any uses for merging, but initially, you’ll probably find flattening works best.
There are actually two kinds of layers: normal and floating. A floating layer is a temporary layer that holds a pasted selection prior to applying it to either a new layer or anchoring it in the currently active layer. Floating layers have a few limitations due to their transient nature. Just be certain to convert the floating layer to either a new layer or anchor it by using the appropriate selection from the Layers Menu. Anchoring a floating layer causes it to be composited with the currently active layer or layer mask.
A layer mask is a tool for constraining which parts of a layer should be used in the composited image. This is best shown with a simple example. Let’s start with a background layer with a simple gradient applied (Figure 4). Next, add a new layer (via the Layers Menu—click over the layer name with the left mouse button) and apply a different gradient. Then, add the layer mask by opening the Layers Menu and selecting Add Layer Mask. Make the layer mask fully transparent by selecting the Black toggle in the Add Mask Options dialog box. Make sure the new layer is the active layer by clicking on its preview image. The image state should look similar to Figure 5.
Figure 4. Background Layer Plus Gradient
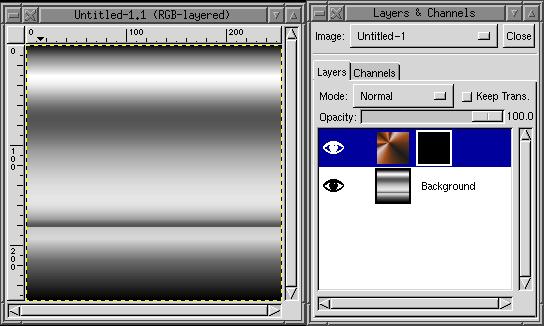
Figure 5. Background Plus Two Gradient Layers
Now open a new image, a TIFF file that is a black and white image of a leaf (Figure 6). The leaf is white with a black background so that it will allow the current layer to show up in the interior of the leaf (the white areas) and allow the rest of the image to be transparent (allowing the first gradient to show through). Then select the entire leaf’s image using “Select->By Color” and copy it to the clip buffer using the Image Windows menus (“Edit->Copy”). Paste that into the gradient layer and anchor it. The pasted image becomes part of the layers mask.
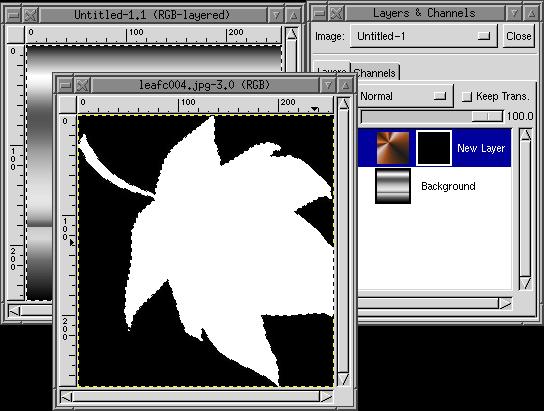
Figure 6. Leaf Image
Note that you can set whether a floating layer is anchored to the main layer image or to the layer mask by clicking on the preview images in the Layers and Channels dialog. The outline of the preview image is highlighted to show which part of the layer will be used to anchor the pasted image.
Now the image has two layers, with two different gradients applied. The top layers gradient only shows up where the leaf’s mask is white. Figure 7 shows the final image with the Layers and Channels dialog.
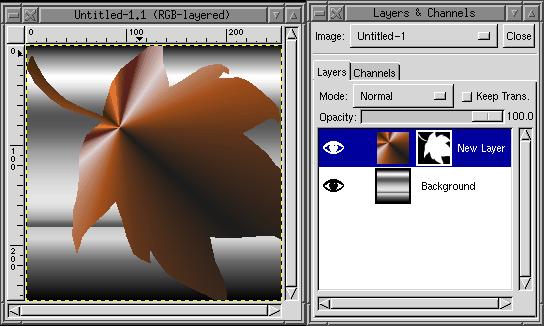
Figure 7. Final Image
You can turn the layers mask on and off by holding down the control (ctrl) key while clicking the left mouse button in the masks preview image for the active layer. Alternatively, you can view just the mask by holding down the alt key and left-button clicking in the masks preview image. In the former case, visibility turned off creates a red border around the layers mask preview. In the latter case, visibility of the actual layer creates a green border. I don’t use this feature much yet, but it’s nice to know it exists.
The Layers Menu provides an Apply Layer Mask option which will composite the mask with the layer, if accepted. The same option provides the ability to discard the layers mask, in which case the mask is removed and no longer affects the layer or the composited image. You will need to apply the layer mask if you wish to use some filters or effects from the Image options in the Image Window menus.
A Quick Look At Filters
The GIMP is designed around the concept of external programs which handle much of the detailed work of the application, such as file I/O and image processing. The latter are commonly referred to as image filters since they filter the pixels in an image to produce an interesting effect.
To access the filters you use the Image Window’s pop-down menu. The top level of this menu holds the Filters submenu. Under this submenu you will find an array of options including such categories as Artistic, Blur, Edge Detect, Render and many others. Each category has one or more filters associated with it.
Filters can operate on an image without any further user input, but most require the setting of variable parameters. When the filter is selected the GIMP launches the external program and opens a communications path to it. The plug-in filter then requests a dialog box with any number of buttons, menus, sliders or other window features. Each of the configurable items in the dialog has a default value so the user can simply accept the defaults and have the filter process the image. Many of the filters provide preview windows to give the user an idea of how the image will look after the filter is applied based on the configuration the user has selected. Since some processing can potentially take quite a bit of time to complete, some filters allow the preview to be turned off.
It is impossible to discuss the breadth and detail of the available filters in this one article. I plan on writing some tips for using these filters in the future, either to be presented in the “Graphics Muse” column in the Linux Gazette or on my GIMP web pages. In the meantime, I’ll just mention a few of my favorites.
The IFS Compose plug-in is a nifty little tool for creating fractal images. Fractals have been around for some time and many people have grown a little tired of the same old Mandelbrot sets, but this is different. The fractals are actually a set of three Serpinski triangles that can be rotated, scaled, stretched and colored. The transformation of each of these can, when done properly, create some very realistic looking foliage or very artistic backdrops. A nice feature of this plug-in is that it keeps track of its settings between invocations.
The Cubism and Mosaic Plug-Ins (“Filters->Artistic->Cubism” and “Filters->Artistic->Mosaic”) offer some unusual effects. The Mosaic plug-in can produce images that appear as though they have been tiled using square and randomly edged 3D tiles. Cubism applies rectangular patches using the colors of the current layer and user-defined sizes and distributions. You can think of Cubism as “applying rectangular order” to a layer. Use of Cubism will cause a layer to be changed drastically so you might wish to duplicate a layer before applying this filter.
The Whirl and Pinch Filter (“Filters->Distorts->Whirl and Pinch”) creates swirled patterns on the selected area or layer, much like having the image as the surface of a liquid in which you swirl your finger. The amount of swirl or pinch can be user defined, and a preview of the effect is available from the filters dialog window.
The SuperNova Filter (“Filters->Image->SuperNova”) creates a bright sun-like section in the current layer. The Sun has spokes extending out from the center. The color and radius of the sun, the number of spokes, and the position of the sun within the layer are all user definable parameters for this filter. It is often useful to apply this filter on a transparent layer (with the “Keep Transparency” toggle turned off) and then add or subtract it from underlying layers.
And then…
There are lots of other filters, and the number of ways in which they can be used is endless. Next month I’ll cover the Toolbox in its entirety, explaining what each icon is and how it is used. I’ll also cover more details on creating and using selections as well as how to add and manipulate text within your images.

Michael J. Hammel (mjhammel@csn.net) a Computer Science graduate of Texas Tech University,is a software developer specializing in X/Motif living in Denver, Colorado. He writes the monthly Graphics Muse column in Linux Gazette, maintains the Linux Graphics mini-HOWTO, helps administer the Internet Ray Tracing Competition (http://irtc.org/) and coauthored the text The Unix Web Server Book, published by Ventana Press. His outside interests include running, basketball, Thai food, gardening and dogs.