Vorta is a fairly new GUI for BorgBackup (or Borg for short), a command line backup tool with encryption, deduplication, compression and validation. Both Vorta and BorgBackup are free and open source software, and they run on Linux and macOS.
BorgBackup a secure, deduplicating backup program
BorgBackup is a secure and efficient command line backup tool that can store the data on any host available over SSH, or local drives.
- Secure. To protect the data, client-side 256-bit AES encryption is used, and data integrity and authenticity is verified using HMAC-SHA256.
- Efficient. Data deduplication is used for backups, only adding new data to the backup repository. This helps reduce both storage space usage and network bandwidth utilization, since it doesn’t backup duplicate data blocks. The Borg deduplication does not depend on files and directory names staying the same, complete files or time-stamps staying the same, or the absolute position of a data chunk inside a file. Compression is also supported – using lz4, zstd, zlib or lzma.
What’s more, Borg can mount backup snapshots as userspace filesystems, so you can take a look at the contents of a backup before restoring it, or restore only some file, using a regular file manager.
For how to install BorgBackup, head over to its installation page (hint: it’s most probably available in your Linux distributions’ repositories – this includes Arch Linux, Debian / Ubuntu / Linux Mint, Gentoo, Fedora, openSUSE, and Raspbian.).
Vorta Backup Client (BorgBackup GUI)
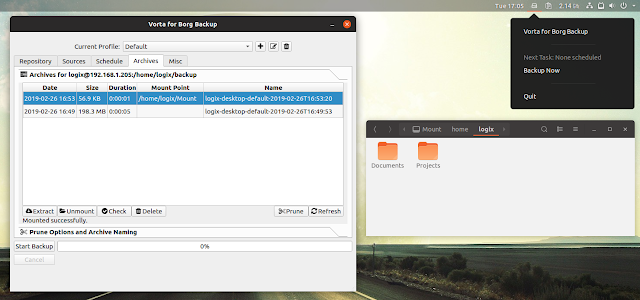 |
| Vorta application window, its system tray menu, and a backup mounted and opened in Nautilus file manager |
Vorta is a graphical user interface for BorgBackup that runs on macOS and Linux. Its features include:
- Backup profiles. These can be used to backup different sources to different destinations, using the same SSH keys. For example, this allows backing up some important files to a remote server, while doing a full backup to a local storage device.
- Backup scheduling with a log viewer, and custom shell commands that can run pre or post backup.
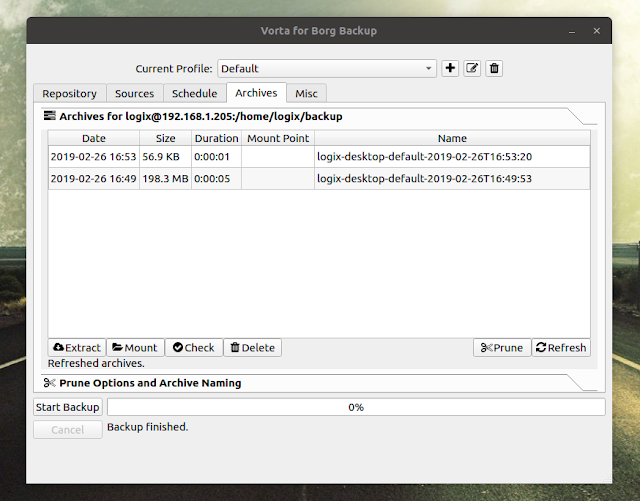
- Backup archives view with timestamps, from where you can extract, mount, check, delete or prune backups.
- Configurable pruning (remove old backups after a certain period).
- Built-in SSH key generation.
- Filenames/path exclude patterns.
- GUI options like dark/light system tray icon, light/dark application theme, display notifications when backups fail and/or are successful, and automatically start Vorta at login.
How to install Vorta BorgBackup GUI
To download Vorta for Linux or macOS, head over to its releases page.
The latest Vorta release has added an experimental Linux 64bit binary, built on Ubuntu 18.04, which includes the BorgBackup binary (so you don’t have to install it separately on the machine that runs Vorta). Right now, to use this Vorta Linux binary you need to use a fairly recent Linux distribution release(GLIBC >= 2.25), but this should change in the future. It should work with Ubuntu 18.04 and newer, Fedora 29 and newer, Linux Mint 19 and newer, Debian buster/sid etc.
It’s also worth noting that the Vorta option to automatically start the application on login doesn’t work when using the Linux binary. At least it didn’t work on my Ubuntu 18.10 desktop. So if you want to automatically launch Vorta on startup, you must add it to your startup applications using the options provided by your desktop environment.
To install Vorta on Linux, download the Vorta Linux binary (vorta-linux64) in your home folder, and run this command to install it to /usr/local/bin:
sudo install vorta-linux64 /usr/local/bin/vortaNow type vorta in a terminal (or in the Alt + F2 run dialog) to launch it. If you want to add it to your applications menu you can use a tool such as MenuLibre.
Vorta stays hidden, running in the system tray. If you use Gnome Shell, you may want to install the AppIndicator support extension to access the Vorta system tray menu (not required on Ubuntu since this extension is installed by default). If the Vorta tray icon doesn’t match your panel color (it uses a dark tray icon by default that can be hard to see if you’re using a dark panel), change it to a light icon from the Vorta settings (on the Misc tab).
You may also launch the Vorta GUI in the foreground and open its main window:
vorta -fAlternatively, you may also install Vorta from source, using PIP.
Getting started with Vorta
Step 1. Setup a SSH key.
To get started with Vorta, launch the application and on the Repository tab, next to SSH Key, click the drop-down and select Create new key. Leave the recommended defaults unless you want some different settings and you know what you’re doing, and press the Generate and copy to clipboard button. Close the Vorta SSH Key generation window once the key has been generated.
If you don’t want Vorta to ask for the SSH password each time you create a new backup, you’ll want to create a SSH passwordless login. That’s beyond the point of this article, but you can find guide for this online, and it’s quite easy.
This SSH key generation step is only required if you want to use a remote backup repository. If you’re using Vorta to backup to a local storage device you can skip this step.
It’s worth noting that when using a remote repository for backups, BorgBackup needs to be installed on the remote server. Check out the BorgBackup installation page for details.
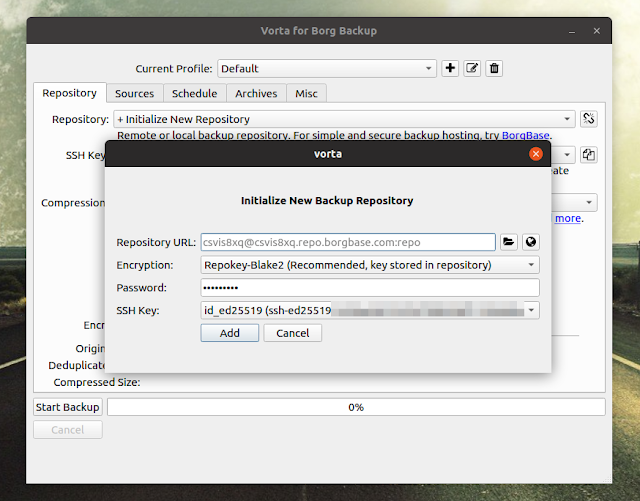
Step 2. Create a new backup repository.
Next, you should see a Repository field with a drop-down. Click Select Backup Destination -> Initialize New Repository and:
- press on the folder icon if you want to store the backup locally, and select the backup directory.
- enter the repository URL if backing up to a remote server, and for the
SSH Keymake sure you select the same SSH key created in the previous step.
Enter a password and press Add to initialize the new backup repository.
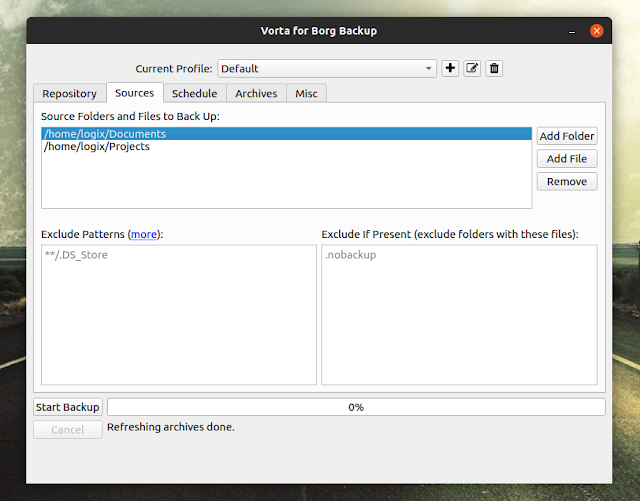
Step 3. Select the files and folders to back up.
On the Sources tab in Vorta, press Add Folder and/or Add File to add the files and folders you want to back up. You may exclude some files/folders or add exclude patterns here.
Step 4. Create a backup using Vorta.
Now it’s time to create your first backup using Vorta and BorgBackup. Press Start Backup in the lower left-hand side corner of the Vorta window to create a backup. All backups can be seen on the Archives tab:
You may also want to create an automatic backup schedule:
This can be done from the Schedule tab. Select the time interval for your backups, optionally enable pruning of old archives, and press Apply.
Want to restore a backup created using Vorta? Go to the Vorta Archives tab, select a snapshot and press the Extract button. You can also mount a backup by selecting it and pressing Mount – this way you can open it using your file manager and check the backup contents, copy some files from the backup without restoring it, etc.
 Linux, Linux OS, Free Linux Operating System, Linux India Linux, Linux OS,Free Linux Operating System,Linux India supports Linux users in India, Free Software on Linux OS, Linux India helps to growth Linux OS in India


