Our series winds up with a detailed description of the toolbox, plug-ins and keyboard acceleration.
Last month we talked about the Image Window and Layers, two very important topics when learning about the GIMP. Image Windows are where image processing work is displayed and where you pick the elements of the image to be worked on. Layers provide even more control over those selections. This month we take a look at the Toolbox, the set of buttons that drives most of the major processing tools, including various styles of selections. We also look at using text and filters, and briefly discuss scripting.
The Toolbox
The most recent developer’s release of the GIMP used for this article included a more compact version of the Toolbox than earlier versions. None of the tools were dropped, but the excess blank areas in the buttons and menu bar were removed. This saves some screen space on smaller displays, although I found it a little hard, with my aging eyes, to make out some of the buttons on an 1152×900 display. Keep in mind that most tools and many features in the GIMP are also accessible via keyboard accelerators, also known as keyboard shortcuts. I’ll only mention a few, but take note of them when you experiment, as they help speed your work tremendously.
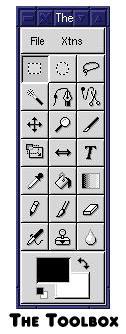
Figure 1. The Toolbox
The Toolbox is made up of buttons set in a seven row by three column box, with a menu bar at the top and a foreground/background color selection box at the bottom. The menu bar holds a File menu similar to the one in the Image Window (although with fewer options) and an Extensions menu. The latter allows you access to the Script FU scripting interface. We’ll get to that a little later. The tools are selected by a single left-button mouse click over the appropriate button. A double click opens the Tool Options dialog window that provides access to configurable options for the selected tool, if any are available.
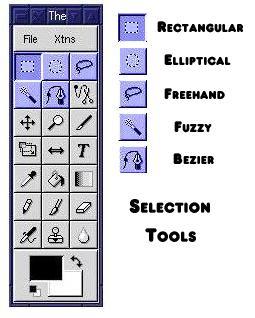
Figure 2. Selection Tools
The first row of buttons and the first two buttons in the second row are the Selection Tools: Rectangular, Elliptical, Free Hand, Fuzzy and Bezier. Rectangular and Elliptical draw the respective type of outline as you drag the cursor, left mouse button down, around the Image Window. Holding the shift key down while dragging will form a uniform box or circle. Free Hand will draw an outline which follows the path of the cursor as you drag it. Note that when you release the mouse button while working with the Free Hand selection, the selection is closed between the starting point and ending point of the cursor’s path. The Fuzzy select will select a region of an image based on the colors in the region where you click with the left mouse button. This sort of selection works best for images that do not contain gradients or wide ranges of colors over very small areas. The Bezier selection tool allows a region to be outlined in precise detail. The Bezier tool was used to select points on the outline of the monitors (after each point was selected, a straight line was drawn connecting the last two points) on the cover of the November issue, back when part one of this series ran. Once a complete outline is selected, a single click on the inside of the selected region activates that region and the marching ants began their dance around the selection’s outline. Bezier selections can also be used to select outlines of very jagged regions, but the method for doing so is beyond the scope of this article. Note that all the Selection Tools have configurable options. They all support anti-aliasing and user-defined feathered regions.
The third button on the second row is the Intelligent Scissors button. At the time of this writing that feature was not yet supported.
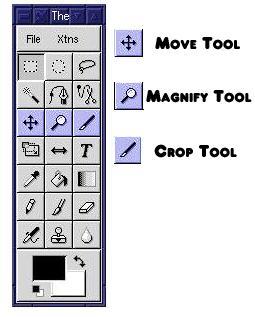
Figure 3. Move, Magnify and Crop Tools
The third row of buttons holds the Move, Magnify and Crop tools. The Move Tool allows a selected region or regions to be moved. The Move tool is more sophisticated than it might seem at first. When used with the Layers and Channels dialog, it becomes possible to select various pieces of an image to adjust them within the framework of the complete image.
The Magnify Tool is used to zoom in and out of the image. This is useful for finding the edges of nearby objects in an image. At times, you might bucket-fill a region only to find the fill process covered more of the image than you expected. Using the zoom tool might show that a tiny region of the fill area is not enclosed by colors different from the fill region, indicating that the fill process “leaked” into adjoining regions.
The Crop tool selects a region by boxing it out; hold down the left mouse button, drag and release to select a region. A dialog box will open giving the dimensions of the selected region. At this point the region can be cropped; that is, the area outside the boxed region is discarded and the Image Window is resized to the area defined by the Crop Tool. All Layers are cropped to the new dimension. Note that there are image filters which can also perform various forms of cropping.
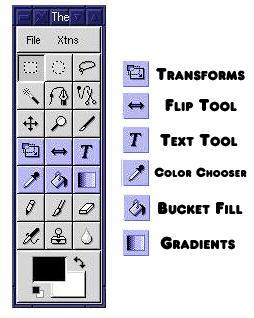
Figure 4. Transform and Other Tools
Button one in row four is the Transform Tool. Select a region or layer of the image and then click on the Transform Tool button. Next, click inside the selected region or layer. The area will be outlined with a rectangle and the corners will be outlined with small, wireframe boxes. By default, the Transform Tool is configured to perform rotations on the selected region. Double clicking the Transform Tool button brings up the Tool Options dialog where you can select one of Rotate, Scale, Shear or Perspective for the selected region or layer. Scaling will work with any selected area but be aware that scaling of text can, if enlarged too much, cause aliasing (jagged edges) to occur. Click, hold and drag the mouse inside the selected region in order to perform the current transform.
The middle button of row four is the Flip tool. Click on this button to flip a layer, image or selected region either horizontally or vertically. The Tool Options dialog for this tool provides the mechanism for selecting the direction of the flip. A flip reverses the pixels of the area to be flipped—the rightmost pixels end up on the leftmost side in a horizontal flip, and the topmost pixels end up at the bottom in a vertical flip.
On the outside of the fourth row is the Text Tool. Clicking once on this tool will enable the tool, but you need to click inside an Image Window to bring up the Text Tool dialog. This dialog is used to select the font characteristics of the text you wish to insert in the image. The color of the text will match the current foreground color, so be sure you have set the foreground color (described in a later section on Colors) before clicking on the OK button in the Text Tool dialog. Once you click on OK, the Text Tool dialog closes, and the text is inserted in the image with the marching ants (if enabled) dancing around the edges of the text. At this point you can click on the Move Tool to move the text to the desired location. Once you’re familiar with the GIMP, you’ll find that it’s not necessary to click on the Move Tool. However, when first starting out, it’s important to be familiar with the current mode of GIMP operation by explicitly selecting the Tool of interest.
An important note about adding text: text is inserted into an image as a floating selection. Floating selections have their own, temporary layer in the Layers and Channels dialog. They require the user to select a disposition for them before any further work can be done on other layers. A floating selections disposition can be one of “Anchor” or “New”. Anchoring a layer composites it with the current layer. Marking a floating selection as a new layer adds it to the top of the set of layers that make up the current image.
The next row is made up of the Color Picker Tool, the Bucket Fill Tool and the Blend Tool from left to right. Colors in the GIMP can be selected through the use of the Color Selection dialog which allows fairly detailed selection of the Red, Green and Blue levels along with HSV (hue, saturation and value) levels. However, if you need to use a color that already exists in your image, the Color Picker Tool, which resembles an eye dropper, is a much quicker way to set the foreground color to the desired color. Click on the Tool’s button and then move the mouse over the pixel in the image window which contains the color you wish to use. Important note: be sure the layer in which that pixel lives is currently active. When you click in the image window the foreground color is set to the color of the pixel over which the mouse sits. The foreground color’s setting is shown in the box at the bottom of the Toolbox. The two large boxes represent the current foreground (upper left) and background (lower right) colors.
Filling a region of the image with either a solid color or a pattern can be done using the Bucket Fill Tool. First, select a region of an image using one of the Selection Tools (or use ctrl-A to select the entire active layer). Next, double click the Bucket Fill Tool’s button to bring up the Tool Options dialog. If you want a solid color to fill the selected region, click on the Color Fill toggle button. Select a color for the foreground by double clicking on the foreground box at the bottom of the Toolbox. The Color Selection dialog will open. Set the color to Red, for example, and then click on OK in the Color Selection dialog. Now, you’re ready to fill in the selected region. Simply click on the selected region, and the GIMP fills it with a solid red pattern. You can also fill regions without selecting them using the Fill Threshold slider in the Tool Options dialog for the Bucket Fill Tool. The transparency amount can also be set prior to doing the fill.
Instead of a solid color fill, you can also fill a region with a given pattern. There are a host of default patterns available with the GIMP. To choose a pattern you first click on the Pattern Fill toggle in the Tool Options dialog for the Bucket Fill Tool. Then place the mouse over the Image Window which will be filled and type ctrl-shift-P to open the Patterns dialog. Click on one of the patterns to select it. Then click on the selected region to have the GIMP fill it with the selected pattern. If you create an interesting pattern you wish to use for Pattern Fills, you can save it as a PAT file from the Save Image dialog.
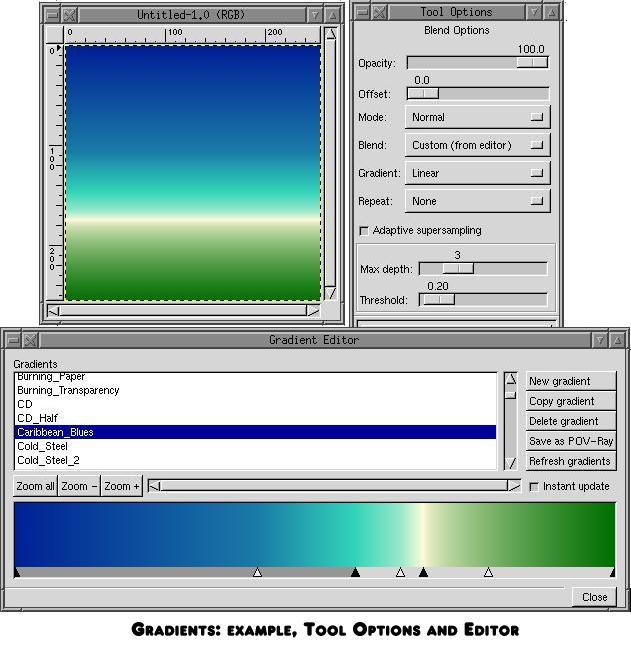
Figure 5. Gradient Editor
The last tool in the fifth row of the Toolbox is the Blend Tool. This tool is used for filling a region in a direction the user specifies with a blended color pattern. The colors used can be blended from foreground to background, foreground to transparent or from a custom gradient provided by the Gradient Editor. The Gradient Editor can be opened from the Image Windows pop down menus as “Dialogs->Gradient Editor”. There are a number of default gradients that come with the distribution as well as a number that have been created or collected by the Gradient Editors author, Federico Mena Quintero, known affectionately to the GIMP developers as Quartic. The resources section of this article lists Quartic’s web pages which are considered the definitive resource for finding anything related to the GIMP, including more custom gradients.
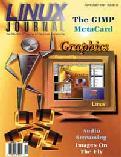
A full description of gradients would take many pages, but to get an idea of what can be done with them, consider the cover art for the November 1997 Linux Journal shown at the beginning of this article. The gold background is one gradient, the colors of the stick man are another. Gradients are very useful for creating all sorts of special effects.
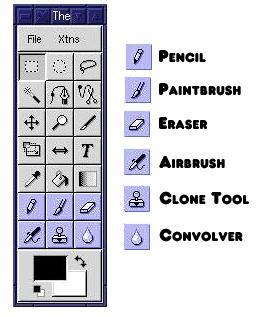
Figure 6. Pencil, Paintbrush and Other Tools
The next four buttons are the closest thing to drawing tools the GIMP provides. They are, in order: the Pencil Tool, the Paintbrush Tool, the Eraser Tool and the Airbrush Tool. Each of these requires that a brush type be set. (There is a default setting, but you’ll find you’ll wish to change this fairly often.) The Brush Selection dialog allows selection of the brush type. Once selected the brush type is applicable to each of the drawing tools. The Pencil Tool draws solid lines that follow the shape of the brush using hard edges. Using a brush like the Duck or Guitar results in an effect similar to using a stencil. The Paintbrush works similarly, although the edges of the stencil are much softer, having been antialiased.
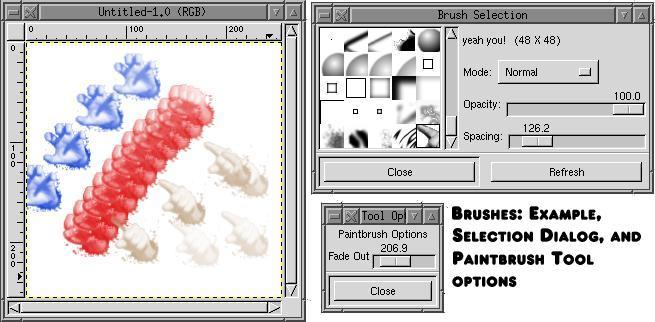
Figure 7. Brushes
The Eraser Tool works just the opposite of the Pencil Tool in that the shape of the brush is used to remove the underlying pixels. Note that this does not mean the new color for the pixels is the background color; instead, the pixels become transparent. Finally, the Airbrush Tool works similarly to the Paintbrush but acts as if the pattern is being blown onto the canvas at a given rate and pressure.
All of the drawing tools use the current foreground color, to do the drawing. If the brush type is not a solid pattern, the darker areas of the brush come out in the foreground color, and the lighter areas of the brush come out transparent (with the current pixels showing through the area the brush doesn’t cover). This behavior can be modified using the Mode and Opacity settings on the Brush Selection dialog. The dialog also allows you to specify how fast the brush is applied using the Spacing setting. Lower spacing values cause the brush to be repeated quickly, overlapping the individual applications of the brush shape. Higher settings cause the brush to be applied less often as the mouse is moved around the Image Window.
Aside from the Airbrush tool, the bottom row of the Toolbox also contains the Clone Tool. A rubber stamp icon represents this tool in the Toolbox. This handy tool allows you to use one part of an image to paint or “smudge” over another part of an image. This is useful, for example, for removing the edges between pasted objects or for clearing the edges in a tileable image. Tileable images are ones which, when repeated side by side and top to bottom, have no seams between the images, thus creating the illusion of a solid image. Tileable images are often used as background images for web pages.
To use the Clone Tool, click on the middle mouse button on the bottom row of the Toolbox. Now, place the mouse over the Image Window on the spot you wish to use as the beginning source location. Hold down the control key and press the left mouse button over this spot. A crosshair is displayed beneath the mouse pointer to signify the source has been selected. Now move the mouse to where you wish to begin cloning. The distance and angle between the source and destination points will remain constant as you hold down the left mouse button and drag it around the image. The area used as the source will be the same size and shape as the current brush type, so be sure to set it before beginning the cloning operation. When removing edges in an image, use a brush type that has soft edges; that is, edges that fade from black to white. The Nove brush is good for this type of work. Note that the clone tool can also use a pattern type, just like the Bucket Fill Tool. The use of the pattern or the image as the source can be selected from the Clone Tool’s Tool Options dialog.
The last tool in the Toolbox is the Convolver Tool. This tool can be used to sharpen or blur areas of an image; the choice is made from the Convolver Tool’s Tool Options dialog. Just select the tool from the Toolbox and then start dragging the mouse around the area of the image you wish to sharpen or blur. The operation is not very obvious using the default settings, which have a Pressure setting of 50 in the Tool Options Window. Play with it a bit to get the hang of how much dragging is required for the desired effect. Increasing the Pressure setting will cause the blurring to be more obvious with less work on your part. The Convolver, along with the Clone Tool, can be used to clean up sludges or to remove unwanted lines and streaks from images.
At the bottom of the Toolbox window, you’ll find the Foreground/Background color selection box. This box contains two large boxes, a two-ended arrow and two smaller boxes. The large boxes are the foreground color and background color (top left to bottom right, respectively). Clicking on either will open the Color Selection dialog allowing you to set the current color. The two-ended arrow allows you to swap the foreground and background colors. The smaller boxes, below the foreground color box, reset the colors to their default values.
Most operations use the foreground color for fill, paint and drawing operations unless a pattern has been set. The color should be set prior to clicking on the tool of interest or the results may be unexpected. New layers can be created using the background color as well, so be sure you’ve chosen the color you want prior to creating the new layer.
Selections
One of the most important aspects of any tool like the GIMP is the ability to select regions of an image to be processed. Knowing the types of selections that are available and how to use them will greatly enhance your use of the GIMP.
The simplest selection is the one which selects the entire current layer. This particular selection can either be done via the Image Window menus or by using the ctrl-A keyboard accelerator. Once selected, the region is surrounded by the marching ants. Once a region is selected, it is important to know how to turn off the selection. One method is to click on one of the Selection Tools in the Toolbox and then click the left mouse button in a region of the image that is not currently selected. In the case where ctrl-A was used to select the entire layer, you need another way to turn off the selection since there is no section of the image that is not selected. Again, the Image Window menus and keyboard accelerators provide the answer. shift-ctrl-A turns off the selection. Note that this will turn off any selection, not just those created with ctrl-A.
The Toolbox offers the five basic selection methods: Rectangular, Elliptical, Free Hand, Fuzzy and Bezier. For those of you who have used Adobe Photoshop, the Rectangular and Elliptical selections are accessed from Photoshop using a single tool called the Marquee. The Free Hand selection tool in the GIMP is referred to as the Lasso in Photoshop. All of these work basically the same, although the Tool Options dialogs in the GIMP look different than their counterparts in Photoshop.
The Bezier selection tool in the GIMP is accessed via the Lasso tool in Photoshop using Paths. In the GIMP the user creates the paths for the selection using the tools in much the same manner as the Free Hand tool except that control points are used to refine the path of the selection. Fuzzy selections are based on the range of pixel values over which the user drags the mouse. A fuzzy selection can be used to select all regions with the same single color or all regions which encompass a range of values.
There are a few additional features common to all of the selection methods. First, all selections can be “feathered”. A feathered selection means that the edge of the selection turns into a fading pattern, from current image to transparent. The feathering starts at the edge of the selection and continues out for the specified number of pixels. Also, all Toolbox selections allow for antialiasing, which reduces the jagged appearance of the selection in some cases. Some selection tools provide a “Sample Merged” option in the Tool Options dialog. This option allows the selection to be taken based on the visible image and not just the currently active layer.
Clearing a selection (available from the Image Window menus as “Edit->Clear”) removes the selected region. The cleared area is transparent if the active layer contains an Alpha channel. If it doesn’t, the cleared area takes on the background color. Filling a selection (“Edit->Fill” from the Image Windows menus) will fill a selection to the background color. Selections can be extended by holding down the shift key while performing another selection. They can be reduced or otherwise have sections removed by holding down the control (ctrl) key while performing another selection.
There are a number of other options available for selections, such as selecting regions by color, or extending and shrinking selections. All of these are available from the Selections submenu in the Image Window’s pop-down menu. One of the newer features is the ability to snap selections to the Ruler Guides. The “View->Snap To Guides” menu option toggles the snap action on or off.
Selections can be moved, rotated, flipped, filled, cut, pasted and have any of the filters applied. The selection applies only to the active layer, but whatever process was applied to a single layer can be repeated by simply selecting a different layer, leaving the selection outline in place, and then choosing the “Edit->Redo” option from the Image Window menus. Selections, once moved in any manner, become floating layers in the Layers and Channels dialog. You must make sure this floating layer is given a final disposition—either making it a new layer or anchoring it the currently active layer—before continuing with your work.
Text
One of the most useful aspects of the GIMP is its ability to manipulate text. Logos, cover art and birthday cards are all possible given the many features provided by the GIMP. In order to add text to your images, you first need to understand how the GIMP gets access to text fonts.
The GIMP is based on Xlib and as such has access to the font rendering engines within the X server. This normally means that the GIMP has access to one of two types of fonts: Bitmap and Postscript Type 1 fonts. The former are not widely distributed (such as on commercial CDs from a software store like CompUSA or Egghead Software). My experience has been that you shouldn’t bother with these types unless you happen to be given one. Conversely, Postscript Type 1, more commonly referred to simply as Type1, fonts are quite common. I’ve purchased at least four different CDs with literally thousands of Type1 fonts on them for use with Linux and X Window System applications. In order to make use of these fonts, you need to install them on your system and inform the X server. My Graphics Muse column in Linux Gazette (Issue 14, February 1997) had an article on how to do this titled “Adding Fonts To Your System”. Note that an additional format, TrueType, can also be used if you have a font server available for use. Caldera ships a font server with their packages, but most of the other distributions do not. Font servers have, in general, always been an additional package purchased separately for X servers on Linux systems.
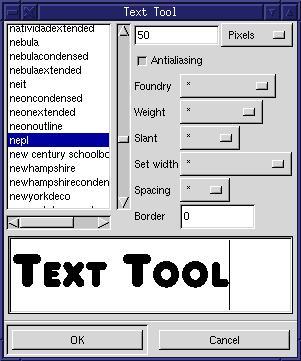
Figure 8. Text Tool Dialog Window
Once you’ve gotten the fonts installed and available under X, you’re ready to use them in the GIMP. The Text Tool in the Toolbox provides access to the fonts and is used to insert text into images. Figure 6 shows the Text Tool dialog window. When you click on the Text Tool button in the Toolbox and then click in the Image Window, the Text Tool dialog opens. If you have a large number of fonts installed on your system, the dialog will not open immediately the first time you access it—wait a moment or two as it gathers information about the available fonts. Subsequent invocations of the tool will not take so long, as the GIMP caches the information about fonts for better efficiency.
The Text Tool dialog provides a scrollable window that lists the available fonts by name, sorted alphabetically. Below this window is a window for typing the text you wish to add to the image. A limitation in the current implementation requires the text to be a single line (no carriage returns), so multiline text has to be created one line at a time. Fortunately, the addition of Guides (from the Image Window’s Rulers) allows a fairly good way to line the text up.
The only other part of this dialog that you’ll find yourself using regularly is the Size setting. The size value is a text field that you can type in to set the size of the font. Next to this is an options menu. This menu has two options: Pixels and Points. The difference isn’t completely clear to me, so I use Pixels most of the time. I expect, when I become more educated as to the use of these settings, I’ll find a need for the Points option. The Size value, however, is an item I use quite often. Note that when you type in a new size and press enter, the text field at the bottom of the dialog is adjusted to reflect the new size. Also note that the text in this field is not antialiased, even if the Antialiasing toggle button in the dialog is set (it’s set when the toggle appears depressed). The antialiasing setting only affects the way the text is displayed in the image.
When you have finished setting up the font type, size and text, click on the OK button to apply the text to the image. As I stated earlier, the text is applied to a floating layer and can be moved around that floating layer. When the text is applied in this way, it is presented in the Image Window with the marching ants outline and a transparent (i.e., the underlying image is visible) body. When the cursor is placed over the transparent section (anywhere inside the marching ants) the text can be moved. For some fonts and sizes, it becomes very difficult to find the body of the text with the mouse pointer. In these cases, click on the Zoom Tool and then click by the text to zoom in on it. Once the text is more accessible to the pointer, you can select the Move Tool from the Toolbox and proceed to move the text around the image. When you have finished, be sure to create the new layer or anchor it to the current layer.
Filters aka Plug-Ins
After all this, we’ve finally come to a place where we can talk about filters. Much of your image work will be based on filters, also referred to as Plug-Ins. These are external programs called by the GIMP to process part or all of the current layer of a given image window. Filters use the GIMP’s Plug-In API (application programming interface) to access image data via shared memory. Although the filters are external programs, they cannot be used outside the GIMP.
Quite a number of filters are now delivered as part of the core GIMP package. They can be placed either in the system plug-in directories, usually /usr/local/lib/gimp/release/plug-ins or in the users .gimp/plug-ins directory. When the GIMP starts, it will query the plug-ins for necessary information so that the menu options can be built. Consequently, when you’ve added large numbers of plug-ins to these directories, the GIMP can take a bit of time to get started. Using the default set of filters, start-up time isn’t too bad on a Pentium 133MHz system.
All of the filters are accessed through the Image Windows Filters menu option. Filters are broken into a number of categories ranging from Blurs to Distorts to Rendering options. Some filters work on the existing image directly, modifying the existing pixels based on the plug-ins function. For example, a blur looks at the pixels in an image and samples those that are near each other to produce a blurred effect. The pixels sampled can be either the whole image or a selected region. Other filters, such as IFSCompose, create new images in the current layer, so you may wish to either start with a completely new image or at least a new layer before running these filters. Experimentation is the key—play with the filters on stock images to see how they effect it and its layers.
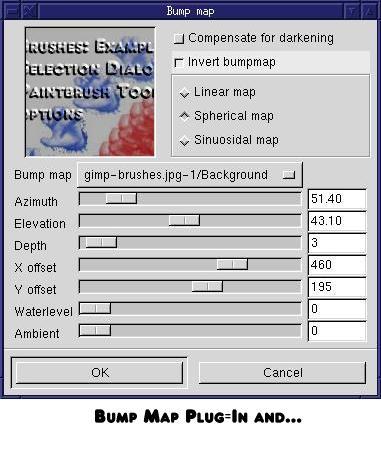
Figure 9. Bump Map Plug-In
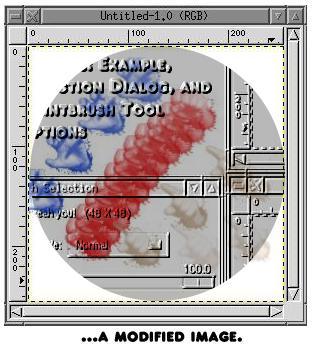
Figure 10. Bump Map Image
I’ve included samples of just two of the filters: IFS Compose and Bump Map. The latter is an interesting 3D effect that is easily added to 2D images. The IFS Compose is a fractal-based tool that can be used to create some rather stunning images. I’ve played with this tool quite a bit and am still amazed at the range of effects that are possible. One important thing to remember about IFS Compose—you can add and delete the control triangles. For the longest time I simply played with the default three triangles. Adding triangles allows even greater flexibility to the effects.
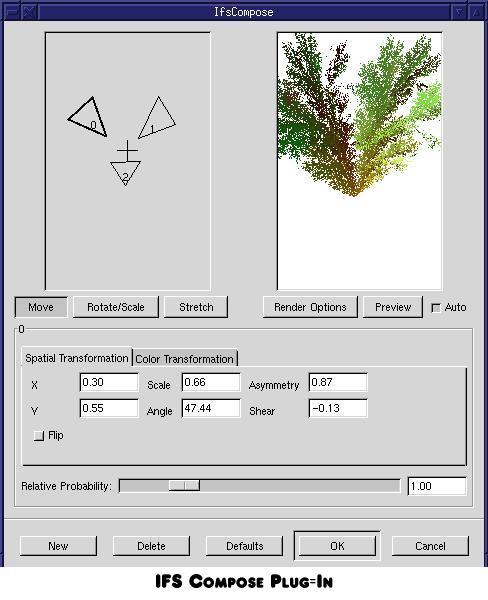
Figure 11. IFSCompose Plug-In
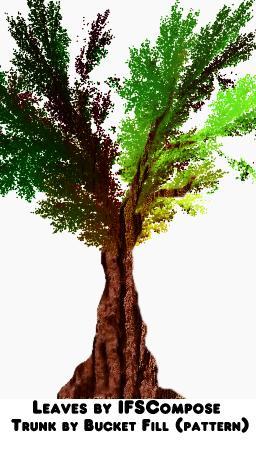
Figure 12. IFSCompose Image
Script FU
An extension to the filters is the builtin scripting language, Script FU. This is a Scheme-based scripting language that allows you to string sets of filters and other GIMP internal commands and tools together to create interesting effects. A set of predefined scripts is distributed with the core GIMP package. Many of these are used to create very interesting logos.
Scripts make use of an internal database of routines that have been registered for use by plug-ins and scripts. This database is called the Procedural Database or PDB. There is at least one script available for browsing the database. All the routines in the database are registered by plug-ins or the GIMP itself using a set of parameters that allow it to be self documenting. The PDB browser prints this information in a window showing the inputs and outputs for the routine, the author and a short descriptive blurb.
I’m not a big fan of Scheme, but that’s mostly because I’m getting old, crotchety and tired of learning the language du jour. There is hope, however, for people like me. The GIMP’s scripting language is just one example of a GIMP Extension. Extensions can be written by anyone, much like plug-ins, but the details are a bit beyond my understanding right now. I do know that at least one other scripting language extension has been written—for Tcl. Unfortunately, I don’t know that language either. Ah, well.
Keyboard Accelerators and GTK
Finally, I think I should mention one of the lesser known but really nifty features of the GIMP. Actually, it’s not really part of the GIMP, it’s part of GTK, the windowing toolkit upon which the GIMP is based. Most windowing systems have keyboard accelerators, or keyboard shortcuts, that allow you access to window features directly from the keyboard. This is also true of GTK; however, GTK goes one step beyond. Other toolkits allow developers to predefine the accelerators in the source code or allow users to define them in configuration scripts used by the toolkits at start up time. GTK allows the user to set the accelerators at run time–you simply move the mouse over the menu item you wish to set, making sure the menu option is active (don’t click the mouse on it, just move the cursor over it) and press the keystroke you wish to use for the keyboard accelerator. For example, moving the mouse over the “File->Print” option in the Image Windows menus, I press ctrl-P to set the keyboard accelerator for printing. Now, instead of having to go to the menu option, I just type ctrl-P over the image I wish to print.
Changes to the accelerators are saved between sessions, so you don’t have to redo them each time you start the GIMP. You should be able to disable the accelerator by typing the same keystroke, but that didn’t seem to work in the version I had. If a menu option already has an accelerator, just type the new key strokes to change it. This is a pretty nifty feature, as it puts more control in the hands of the user. As an X programmer by trade, I can say this is definitely a design goal of windowing application developers.

 Linux, Linux OS, Free Linux Operating System, Linux India Linux, Linux OS,Free Linux Operating System,Linux India supports Linux users in India, Free Software on Linux OS, Linux India helps to growth Linux OS in India

