Linux, Linux OS, Free Linux Operating System, Linux India Linux, Linux OS,Free Linux Operating System,Linux India supports Linux users in India, Free Software on Linux OS, Linux India helps to growth Linux OS in India
Part 3 shows us the means to give our game simulator a more professional appearance and to add a few goodies.
In the first two articles of this series, we learned how to install XForms and began building an application (a game theory simulator). In this final article, we spruce up our program and look at a few XForms features that we skipped last month. As always, source code and further information can be found on the home page for this series at http://a42.com/~thor/xforms.
Review of Our Progress So Far
If you’ve been following things reasonably closely, you probably remember the general outline for constructing an XForms-based application:
- Include forms.h to access the XForms routines
- Call fl_initialize() as soon as possible
- Set up your graphical interface by creating forms
- Assign actions to relevant objects by setting callbacks
- Show one or more forms
- Turn control over to fl_do_forms()
Last month, we followed this procedure to get our basic game theory simulator up and running. While that gave us the basic windows we needed to be able to control and observe the underlying simulation, there were a number of shortcomings. We had no way to save the settings of any particular run of a game, no pull-down menus and no pixmaps to make our program look somewhat professional. The new version of the simulator (called xgtsim2) adds all of these elements and includes a few other bells and whistles that we discuss throughout this article.
The basic approach, however, has not changed. If you could follow last month’s source code, you should have no difficulty understanding xgtsim2, even though it is a larger piece of software. The core of the program is the same, since all we have done is add a few more features. Extra features make a program useful, and one of XForms’s great strengths is in providing straightforward methods for enhancing a program’s usability.
A Look at xgtsim2
You can find the source code for xgtsim2 in Listing 1 on the home page, but it will save you a lot of time if you download it from the web site. Saved as an ASCII file with the name xgtsim.c, it compiles with the command:
gcc -lX11 -lforms -lm xgtsim.c -o xgtsim
From within the X Window System, you should be able to run the program by entering ./xgtsim2 in whichever directory you compiled it in. The running program should look something like Figure 1.
Figure 1. Screen Shot of xgtsim2
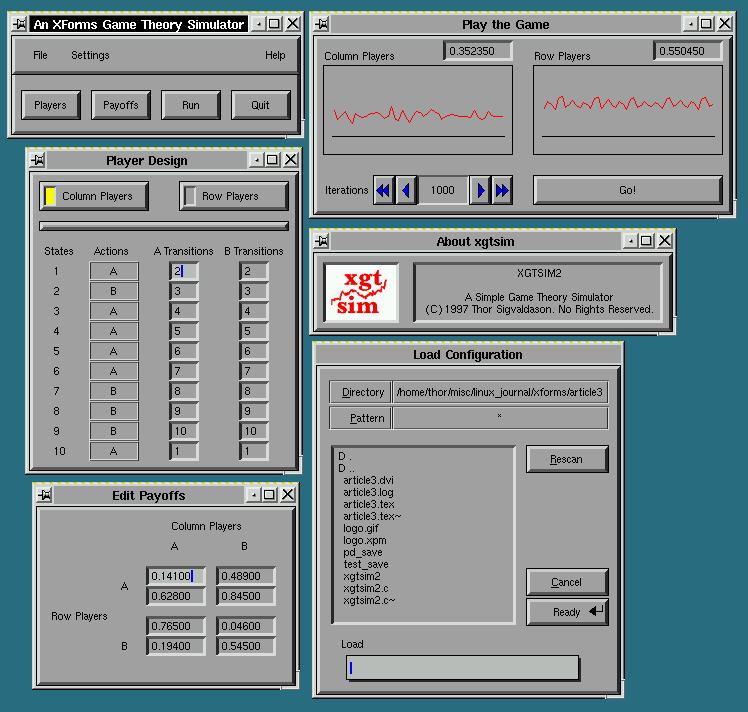
As noted near the top of the source code, everything that has been added to xgtsim2 since last month’s program (i.e., the original xgtsim) is marked by the string *NEW*. This should make it a little easier to find the segments of code we discuss below.
New Items
The first thing to notice when xgtsim2 runs is that the starting window (main_window) is a little larger than it was last month, and it now includes three pull-down menus (File, Settings and Help). Adding these menus with XForms is quite straightforward. If you look at the code for the create_forms() function, you’ll see we have added an FL_UP_BOX to hold the menu items, then call fl_add_menu() three times. The inclusion of the FL_UP_BOX isn’t strictly required, but it does make our menu area stand out from the rest of the main window.
In the first of the fl_add_menu() calls, we create the file menu. Note that this involves only a single FL_OBJECT, with the menu entries (e.g., About, Load, etc.) being assigned to this object with the use of the fl_addto_menu() function. That is, we need to assign only a single callback for the entire menu, which we do by telling XForms we want the function file_menu_routines() to be called whenever any entry in our File menu is selected by the user.
A little earlier in the source code, we can see that file_menu_routines() uses a call to fl_get_menu() to figure out which of the four possible entries was actually selected. It then calls the appropriate function. If, for example, the user selects About from the File menu, XForms knows it must execute the code included in file_menu_routines, because that’s the function we have assigned with the callback. In calling this function, it passes the file menu object to the routine, so the call to fl_get_menu() returns a 1 (since About is menu item 1).
We use a very similar structure for the Settings and Help menus, creating a function to handle the callback for each (settings_menu_routines() and help_menu_routines()). With just a few lines of code, we have added a fairly complete menu system to the program. XForms does most of the hard work here, such as actually drawing the menus when the user clicks on them, highlighting the entries and so on. This leaves us free to focus on the underlying flow of the program.
One common element of menu design we have not implemented is the use of keyboard shortcuts. XForms allows for these accelerators via the fl_set_object_shortcut() function, as well as offering mechanisms to grey out menu entries under certain conditions, change the visual look of the menus and so on. More information about these routines can be found in the XForms documentation (see Resources).
Other additions to create_forms() are calls to fl_set_object_resize() and fl_set_object_gravity(). The easiest way to see what these do is to run the original xgtsim and resize the main window with the mouse pointer. If you do this, you’ll notice that the buttons always grow at the same rate as the overall window; make the window really big, and the buttons become enormous. It is not very attractive, so we want to use the gravity and resize parameters to improve this behavior.
Almost all graphical elements in XForms have a default resize setting that causes them to grow in direct proportion to the window in which they were created. We change this behaviour in create_forms() by calling fl_set_object_resize(). This function takes two parameters: the object to which it applies and a setting value, which can be FL_RESIZE_NONE, FL_RESIZE_X, FL_RESIZE_Y or FL_RESIZE_BOTH. For the FL_UP_BOX that holds the pull-down menus, we use the FL_RESIZE_X option, since we want the menu bar to always be the width of the screen but maintain a constant height. Similarly, we use FL_RESIZE_NONE for the buttons so that they remain the same size no matter how the window is changed.
Object gravity is a related concept and determines how objects should be oriented to the window in which they are drawn. Using the example of the menu bar again, we don’t want the menu to drift down at all, even if the user resizes the window to be very large. The function fl_set_object_gravity() requires a parameter for the relevant object and two subsequent values, which dictate orientation behaviour. The first of these determines which direction the upper-left-hand corner of the object should move as the underlying window is altered. The second sets the behaviour of the lower-right corner. Since we always want the Help menu to appear on the right edge of the menu bar (and stay at the top of the window), we use the following form of the function:
fl_set_object_gravity(obj, FL_NorthEast, FL_NorthEast)
Conversely, we want the File menu to stay to the left, so we replace both occurrences of FL_NorthEast with FL_NorthWest in that call. With a little thought on the programmer’s part, XForms makes it quite easy to have windows that resize in attractive ways. This can add a significant amount of polish to any graphical application and make it usable in a wide variety of circumstances.
To dress up our program a little, we have inserted a pixmap in the About window. The actual pixmap data is stored in a variable called xgtsim_logo which is included at the end of the source code. We then need two calls to create the object that holds the pixmap and assign our data to it:
obj = fl_add_pixmap(FL_NORMAL_PIXMAP, 13, 13,
        70, 55,"")
fl_set_pixmap_data(obj, xgtsim_logo)
We declare how much space we need for the pixmap image in the fl_add_pixmap() call, but it is the second function which actually assigns the data. Since this pixmap is just for decoration, we don’t need to declare any callbacks. To use pixmaps as buttons (in the same way that programs like Netscape do), you’ll want to have a look at the fl_add_pixmapbutton() function in the XForms documentation.
The fact that the logo is not particularly artistic should not be taken as a shortcoming of XForms. I am reasonably competent at hacking out C code but, even when equipped with The GIMP, I’m no Picasso.
Using Goodies
With the inclusion of a menu system, resizing parameters and some decorative pixmaps, XForms-based applications like xgtsim2 can be easily polished into user-friendly, attractive software. XForms also provides a slew of easy-to-add program elements called “goodies”.
An example of a goodie occurs in the code for help_menu_routines(). If the user selects Use from the help menu, he gets a window that displays information about how to use xgtsim2. Since the program is just an example, we haven’t actually written any help files for it—we just want to display a window explaining that help is not (yet) implemented. We could create this window manually, adding some text objects, an “OK” button and so on; however, this is a lot of work just to say there is no help available. Instead, we use a goodie called fl_show_alert(). This function accepts three lines of text as parameters, as well as an integer value to determine the placement of the ensuing announcement (the value 1 just tells XForms to place the window in the center of the display). With one line of code, we have an easy way to display text messages to the user without having to design a new window ourselves.
An even more powerful example of a goodie is the XForms-supplied file requester. Writing one of these from scratch can take a good deal of time, since we would need to create a window with some kind of browser, open and close buttons, implement a filtering mechanism, etc. The fl_show_fselector does all of this for us and allows the load_config() and save_config functions in xgtsim2 to be very compact. The full form of the function is as follows:
fl_show_fselector(const char *message,
        const char *directory,
        const char *pattern,
        const char *default)
The four string parameters allow us to set the selector’s message, a specific directory to start from, a filtering pattern, and even a default file name. All of this occurs with a single function call. A somewhat subtle feature of the file selector is the existence of six such selectors, each of which remembers the last directory if the *directory string is passed as length 0. In xgtsim2, we use two of them, one for loading and one for saving. In each case, we declare which selector appears by making a call to fl_use_selector() before calling fl_show_selector(). That way, if users are loading data from one directory and saving it in another, they will not need to keep clicking back and forth between directories each time they want to access files.
There are also mechanisms for adding configurable buttons to the selector, setting the window title, and so on. Anyone who has designed a method for letting users load and save files will appreciate the amount of thought and planning that has gone into this widget.
There are many other goodies provided by XForms, including routines to get input from the user (fl_show_input), other message display routines (fl_show_question) and even a quick and easy method for getting color selections (fl_show_colormap()).
On Your Own
There is still much about XForms that we haven’t touched on in this series, but the documentation included with XForms is excellent at explaining all of the resources available. With a little effort on the programmer’s part, the library provides for fast program development and a professional look. There’s even a form designer included in the XForms package which enables you to design an interface using a mouse. This makes creating complex windows a breeze, and the software produces output which can easily be incorporated into your source code.
Even if you never create a “killer app” with XForms, the basic lessons of placing GUI elements, assigning callbacks and showing windows are reasonably transportable to other programming environments and libraries. These articles should give you the basic knowledge required to create X programs. To paraphrase Donald Knuth, go forth and create great software.