Linux, Linux OS, Free Linux Operating System, Linux India Linux, Linux OS,Free Linux Operating System,Linux India supports Linux users in India, Free Software on Linux OS, Linux India helps to growth Linux OS in India
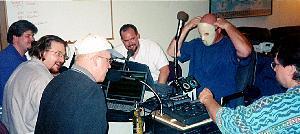
Seven Linux enthusiasts decided that it would be cool to broadcast their own radio show over the Internet.
Five great minds got together and decided that broadcasting over the Internet would be cool—plain and simple. Five great minds quickly turned to seven and an Internet radio station at http://www.opensourceradio.com/ was born. The open-source Community has made this internet radio station possible by supplying all the software components. Two main hardware components are necessary to broadcast on the Internet: a broadcast server and an encoder client. It is not a requirement to separate the server and the client, they can be run on the same machine, but we chose to use two different systems at two different locations to generate our output.
We play MP3-encoded material during our radio show. LAME and Liveice convert the audio output to MP3-encoded specifications so anyone with xmms or Winamp can decode our signal. Broadcasting MP3-encoded material at this time does not require any licensing, however it is anticipated that in the year 2001 royalties will be collected by the agency holding the patent. You can obtain more information regarding these issues at www.mp3licensing.com. If the company that holds the patent imposes royalties, we plan to move to a different encode, decode schema. Ogg Vorbis is a patent and royalty-free compressed audio formatter that we anticipate moving our broadcast server to in the near future. Ogg Vorbis is available at www.xiph.org. Also, the MP3 licensing does not cover issues regarding broadcasting copyrighted material to a public audience so if you plan to run an Internet radio station, be certain you have permission to broadcast anything for which you do not hold the copyright.
We use standard hardware because we found quickly that obscure components introduce unnecessary delays in the setup process. The rest of this article details the setup of each component in our internet radio station. We also describe any problems that we encountered along the way. Please understand that there are a million ways to create an internet radio station, and the choices we made were not due to any alliance with any vendor—we simply made it work in the following mannner.
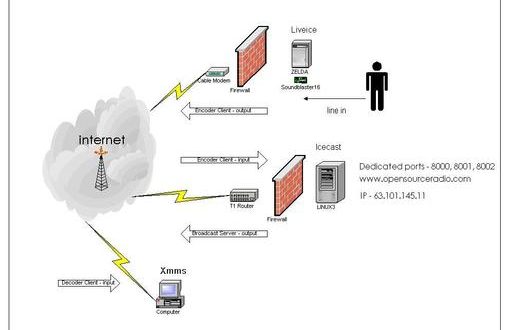
Figure 1 gives an overview of our network that starts when it gets our voices to an MP3 player. We speak into microphones, the microphones convert our voice to analog and the mixer condenses the stream into the line-in on the encoder client that runs Liveice. Liveice picks up the stream and uses LAME to convert our voice from analog to digital. Liveice then sends our digitized stream out onto the Internet to our defined broadcast server that runs Icecast. Icecast takes the incoming stream and broadcasts it onto the Internet at both the destination and port www.opensourceradio.com:8000. Once it is on the Internet, any decoding client, such as an MP3 player, can pick up the stream and decode our digital stream to audio output.
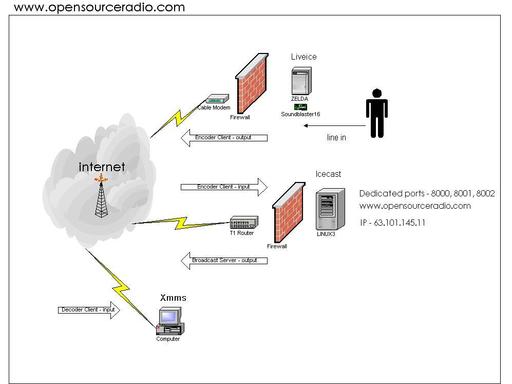
Figure 1. Internet Radio Station Network Overview
Server Requirements
We wanted to succeed right away so we acquired a domain, static IP and a server with open ports. A static IP and domain are not necessary, but by making everything static we don’t need to inform our listener base every time our ISP changes our IP. We also connected our server to the Internet via a T1. This gives us the bandwidth to provide high-quality broadcasting. Our broadcast server, Linux3 and our static IP are provided by www.doitwebcorp.com. The server is a standard networked PC running Red Hat Linux 6.2.
Server Setup
We started by downloading the Icecast server software from www.icecast.org. We chose to use version 1.3.7 because it was considered the most stable release available at the time. We used the default installation that locates the binaries in /usr/local/icecast. The configuration of the Icecast server is very simple, you only need to change one file. The icecast.conf file is very informative. The sections we changed allow the encoder client to send streaming audio to the broadcast server that will be serving to the Internet. Our server is set up with the IP address 63.101.145.11 with the registered domain of www.opensourceradio.com. If you compare the default icecast.conf file to our example icecast.conf file, you will see the fields that we changed. This is only a portion of the icecast.conf file, as it is a very large file.
Listing 1. Example Configuration File for Icecast
Starting Icecast
Icecast is very simple to run. Go into the account you want your broadcast server to run as and enter /usr/local/icecast/bin/icecast. This brings you to console mode on the Icecast server. If you type a “?” at the console you see all of the options that are available with Icecast. We would like to note that from the console you can see when someone connects to the site. If you start Icecast with a -b option it pushes the console to the background. Figure 2 is a screen capture of the startup of Icecast.
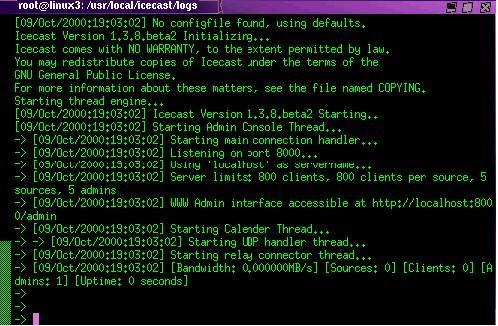
Figure 2. Icecast Startup Screen
Icecast Console
The Icecast console is a powerful tool that allows you to control all aspects of the server. For example, if you wish to get rid of particular listeners, you could use the kick command to boot them. Another useful command is dump, which allows you to dump a stream to a file. The full list of commands is available in the Icecast web interface.
Web Administration Interface
Icecast includes a web-based administration interface that can be accessed by entering the URL http://hostname.domain:port/admin, where hostname is your Icecast server and port is the port number that you defined in the icecast.conf file (see Listing 1). By default the web-based Icecast administration utility is wide open to any system, so be sure to set a password. The help section on the admin page gives detailed descriptions on how to use the web interface. The descriptions include topics that range from setting up user authorization to even disabling the web interface. One of the most useful features of the web interface is a dynamic listing of sources and listener streams. You can configure the administration pages to meet your needs. Refer to the admministration interface for more information.
Server Security
Any site on the Internet should be concerned with security. We recommend that you read all the security documentation that comes with the Icecast server. We also recommend that you do not run the Icecast server as root. You should run the server as nobody or a nonprivileged user.
Problems
We did not experience any problems with the Icecast setup and configuration. Icecast itself is very similar to a typical web server, and it is simple to configure.
Encoder Client
Requirements
Our set up uses a remote encoder client that is not located on the same system as our Icecast server. We use the Liveice client software to generate the output to be streamed to the Icecast server. We use a standard workstation, named zelda, running Mandrake Linux 7.2 with a 16-bit SoundBlaster (ES1371) sound card. We chose the SoundBlaster since it is a widely known and easily supported piece of hardware for our purposes.
Encoder Setup
We started the Liveice software installation by downloading the tar file that we found at http://www.icecast.org/ in the third party applications section. We did not find an RPM at icecast.org. Untar puts the files in our current working directory. Liveice also requires that we run a make to compile the binaries. The README file explains the full installation of Liveice. We put the files in /usr/local to make things simple and accessible via the current path. We changed the liveice.cfg file to point to the broadcast server. You can compare our icecast.conf (above) and our liveice.cfg (below) with the defaults to see where you have to make changes. The README file on the Liveice client offers a better understanding of each parameter. The most important paramenters include SERVER, PORT, PASSWORD and USE_LAME3.
SERVER is the server name that we used setup to the Icecast server. PORT is the port number on the Icecast server. The PASSWORD field must match the Icecast password to allow for the socket connection between Liveice and Icecast. The field USE_LAME3 tells Liveice which encoder to use to convert from analog to digital. The configuration we used works for our purposes, but there are numerous other configurations that accomplish the same output.
################################################
# liveice configuration file
################################################
SERVER www.opensourceradio.com
PORT 8002
NAME ReBroadcast of OSR, 10/5/2000
GENRE Live Linux Talk
URL www.opensourceradio.com
PUBLIC 1
ICY_LOGIN
SAMPLE_RATE 24000
STEREO
SOUNDCARD
FULL_DUPLEX
USE_LAME3 lame
BITRATE 32000
VBR_QUALITY 1
NO_MIXER
PLAYLIST playlist
DECODER_COMMAND mpg123
MIX_CONTROL_MANUAL
CONTROL_FILE mix_command
TRACK_LOGFILE track.log
#SAVE_FILE /osr/osr_10_5.mp3
LAME is an application that we downloaded from http://www.sulaco.org/ and we untarred it in the /usr/bin/ directory. If you put it in a directory that isn’t in your $PATH, you have to put the full path to the encoder in the liveice.cfg file. The encoder is necessary to turn your voice into a digital MP3 format to be received by the Icecast server and broadcast over the Internet. We chose to use LAME, but you can use any encoder engine that you wish to use.
Starting Liveice
To start Liveice, go into the /usr/local/liveice/bin and run liveice. You must be able to connect to the broadcast server for Liveice to start correctly. Figure 3 is a screen shot of what Liveice looks like when started.
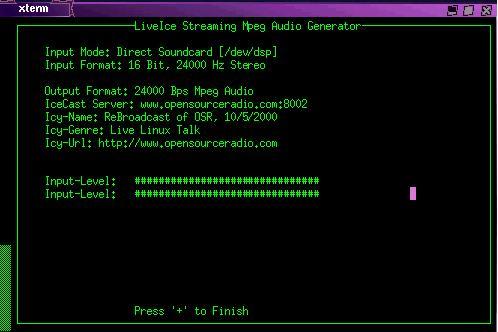
Figure 3. Liveice Startup Screen
Problems
We did not encounter any problems with either the LAME or Liveice setup and configuration. They conform to the open-source standard and are very simple to set up.
Line Input
We purchased an audio mixer that allows multiple microphones to send audio into the line-in port on the sound card. xqmixer recognizes the sound card as audio in to send the stream through LAME to be encoded and send output through the Liveice client. After the Liveice client receives the input, the client streams the output over the Internet to our Icecast server. Icecast receives the stream from Liveice and relays it back to the Internet in an MP3 format to be interpreted by any MP3 decoder client that our listeners choose to use. Xmms and Winamp seem to be the most popular programs to decode MP3 streams.
The mixer provides a greater range of input options. We can run a CDROM, microphones or an MP3 player right into the mixer and out to the Internet. The open-source radio show runs a full range of input to give the true radio feel when we broadcast. We use an audio mixer with six ports for input. Each host has his own microphone that jacks into the mixer, which then connects into the line-in port of the sound card. Any device that generates audio output can be plugged into the line-in port on the sound card.
Problems
Liveice requires specific audio input quality. The sound card, while it receives input, is still controlled by the tools within the operating system. In our case we use xqmixer to control the sound card hardware. On xqmixer, the record volume controls the streaming rate that Liveice receives as input. If the record volume is set too low, you will not hear any output. If it is set too high, Liveice clips the audio. Clipping is an audio engineering term that describes what happens when the audio signal is too strong for the hardware to handle—it “clips” off part of the signal, making it sound terrible. We adjusted our sound quality by tuning the record volume. It’s simple: fire up your station and listen to yourself. If you do not hear anything, increase the record volume. If the playout is clipping, reduce the record volume until you get it right.
Conclusion
The http://www.opensourceradio.com/ show runs every Thursday night from 8:00 P.M. to 10:00 P.M. EST. We discuss open-source issues and use the full range of our mixing and MP3 conversion capabilities. Anyone can do what we have done. With the exception of the mixer, the computer hardware and the T1 connection, everything was free. You can easily download all of the software from the Internet to create an Internet radio station. We would also like to say that despite our sound, no small animals are injured during the course of our broadcast.